
Wireless Spectrum Management: Part 2
Keeping your wireless system running.
21 February 2013
Text:/ Andy Ciddor
In part one of Wireless Spectrum Management, we were guided through the process of setting up and implementing a spectrum management plan by Steve Caldwell, technical manager and radio frequency (RF) engineer at international high-flyers Norwest Productions since shortly after the discovery of sound.
In recognition of the certainty that no spectrum plan will survive a production unscathed, this second instalment is about making it through the event with your system (and hopefully also your sanity) intact.
WEAPONS OF CHOICE
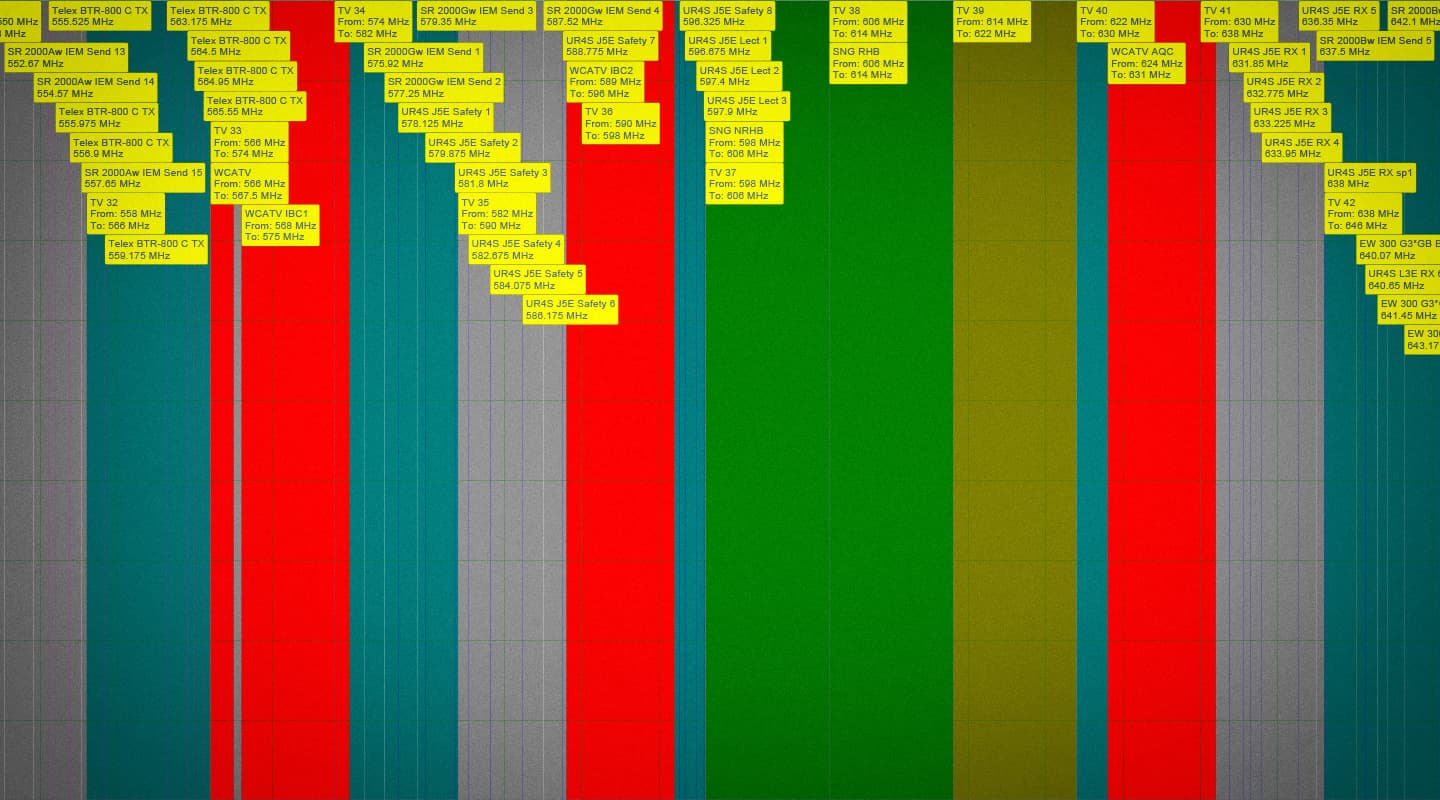
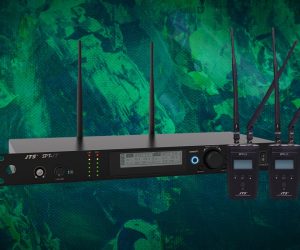
Once all your radio devices are up and running with no interactions, it’s time to start monitoring your entire environment for those unexpected signals that can ruin your day. Steve’s weapons of choice for broadband scanning are Winradio’s G33WSM a software-defined receiver designed specifically as a spectrum monitor for sound engineering (see the sidebar), and its newer sibling the G39DDC Excelsior which has more sophisticated demodulating capabilities and an impressive sweep rate of 1GHz per second.
“I’ve had a G33WSM for almost 10 years now and actually started out with one of the prototypes. It’s been absolutely fantastic,” enthuses Steve. “I use a normal spectrum analyser and VNA (vector network analyser) for more generic tasks but this is great. It’s a fairly small box that you attach to your computer. It’s a broadband scanner that’ll scan the entire broadcast span and display a standard graph of what the spectrum looks like. More importantly, it’s capable of placing software screen markers on each of your known transmitter frequencies or entire frequency ranges, such as known TV channels to avoid.
“It’s got a maximum and minimum hold system so you can actually dial in your particular band of frequencies to scan and the maximum hold will show you all peaks that have occurred since the scan commenced, while the minimum hold will eliminate any short-duration signals. You can let the scanner run continuously, go about doing your other duties, then come back and look over the log and see straight away if there’s anything there that shouldn’t be. It’s all graphical so you can grab the mouse and scan up and down the chart very quickly.
“One of the beautiful things about this piece of equipment is that it’s a software-defined receiver, so not only will it give you an RSSI (received signal strength indication) map of the band, it will actually let you tune in and listen to any of the RF peaks that you see using your computer’s audio system. So you can listen to your radio mics and your IEMs and what have you, which is helpful, but if a rogue frequency comes up you can actually listen to it. This is one of the most effective ways to trace a rogue frequency.
SEARCH FOR STRAYS
“You can spend hours trying to locate a transmitter by direction finding but in most venues, the somewhat vague nature of directional antennas along with multi-path reflections will defeat you every time. You’re much better off putting a set of headphones on and listening to what’s being transmitted on that rogue frequency. It’s easy to hear if it’s comms or an ENG crew but the great thing about it is that if it’s nearby, you are most likely to hear your own PA system in that signal, and using the speed of sound through air, you can determine how far away the transmitter is from your PA. If you’re hearing comms it’s likely to be coming from somewhere backstage or back of house, while an ENG crew will usually be found front of house or just outside the venue. The audio you hear over that transmitter will give you the most information about its location, without a doubt.
“Be very sure that what you’re hearing is the fundamental of the rogue frequency and not an intermod product [see part one for more about intermods – Ed] from either your own radio mics or that of another authorised user. It’s very easy to confuse the audio from an intermod of an authorised radio mic with that from the fundamental of an unauthorised one. If you feel there is a possibility of the rogue signal being a product of two or more of your own transmitters, find an opportune time and switch off your transmitters one by one to see if the rogue signal disappears. Start with IEM transmitters as they usually have the highest power output and also often mix in their own combiner systems to produce intermods. Although it’s often not possible to account for all intermod products, most of the lower order ones should be accounted for in the initial solution calculation and will be avoided.
KNOW YOUR ENEMY
“Another very useful feature of the scanner when tracking rogue frequencies is its ability to show you the sidetones present. If, for example, you’ve got a 19kHz and/or a 38kHz sidetone, you know straight away it’s a standard F3E stereo transmission, and it’s going to be an IEM because that’s the transmission mode they use in stereo. If there’s just a single sidetone between 28kHz and 32kHz, you can bet that it’s going to be a radio microphone. If you’ve got a 100kHz spread-spectrum type transmission, you know it’s going to be a digital carrier of some sort, such as one of the new digital wireless mics.
“Most brands of radio mics have spectrum signatures and getting to know them doesn’t take that long. An obvious one is that the majority of Lectrosonics mics and IFB (interruptible foldback) systems only tune in 100kHz increments. If you find your rogue transmitter’s frequency is 685.100MHz, then there is a good chance it’s one of these. If the carrier is on 685.225 then it’s definitely not. Knowing what kind of transmitter you’re looking for makes it so much easier to find.
“On a production that runs for more than one show, if you have access to power in the venue the whole time you can just leave the scanner running overnight and it will show you anything that has occurred as it’s a cumulative log. If you can see something that’s popped up you can then chase it down or choose to ignore it, based on its power and its distance from your frequencies.
“Part of the standard system, especially for Norwest, is to do a line check on the gear before each show, so you’re automatically doing a check of the RF systems as part of the line check procedure. What you should do during pre-show checks is turn off your radio mics and IEMs every now and then, just to see if there’s anything hiding underneath that can make their performance unreliable.
BE KIND TO STRANGERS
“The thing to do once you identify and track down a stray frequency is not to get upset with the users or bring down the hammer. Not only do you have very little authority in stopping them using that frequency, they’re probably either completely unaware they’re using something they shouldn’t, or that the frequency is already occupied. After all, the spectrum we use in Australia is a resource that isn’t subject to licensing for radio mic users, so anyone can use it.
“It helps to offer them a solution rather than just a directive to stop using what they’re using. I’ve found that most RF users are more than happy for you to manage their spectrum as well as yours. Offering to integrate their equipment into the RF solution is a great way to not only improve the reliability of everyone’s gear but also to gain some trust with them in the future. I now have broadcasters and news crews contacting me before the more regular events, pretty much expecting that I’ll have a working solution for them too.
“I’ve found that the majority of ENG crews are using the same Lectrosonics radio mics and IFBs. I know there are only about three blocks of frequencies available for Lectrosonics in Australia, so what I do as part of my spectrum allocation solution is resolve a handful of additional Lectrosonic frequencies in each of these blocks and keep a note of them with me. That way, if I find an issue I can go up to the ENG crew and offer them a new frequency on the spot that’s not going to cause a massive snowballing of new problems.
“And most of the time they’re okay with it. After all, they’re at the event because the event has some particular significance, so they won’t take the risk of bringing down the whole event for the sake of a 10-minute ENG spot. It also helps to get their phone number and send them a text every now and then to make sure everything is going fine, because the last thing you need is for them to find the frequency you’ve resolved for them is no longer working and they then try something else.”
Steve believes that the actual set up of the equipment for a production is just a small part of the process: “It’s more about making contact and getting on-side with people. The last thing you want to do is get into an RF war with someone. It doesn’t work, believe me. I’ve been there so many times”.

WiNRADiO G33WSM
Software-defined receivers are used in a wide range of applications because their DSP-based signal processing allows additional capabilities such as filters, demodulators and decoders to be added as needed or as new ones are developed. WinRadio in Melbourne effectively invented this type of receiver in the early 1990s and has since been at the forefront of developments in this field. Its WR-G33WSM is a high-performance low-cost VHF/UHF receiver and spectrum analyser, developed for sound engineers who work with wireless microphones, in-ear monitors and other wireless audio devices. The receiver contains a number of features tailored to spectrum management in audio. Its frequency range covers all standard wireless microphone and other VHF/UHF frequencies used in stage production, including the FM broadcast band and point-to-point communications. All control and output is via a connected computer running the accompanying software.
The user interface displays some standard receiver controls such as a tuning knob, frequency display and signal strength meter, supplemented by a number of facilities designed for radio spectrum management. Its fast scanning facilities make it possible to map the radio spectrum environment of a location to determine available frequencies. The spectrum analyser shows absolute signal strength values as well as differences from previous sweeps. Each transmitter signal peak is visible in the scanned spectrum and can be marked with a user-defined tag. A real-time audio spectrum scope shows the instantaneous audio spectrum of the selected demodulated channel. The entire spectrum environment of a location including tags can be saved for later use.
SPECIFICATIONS
Frequency range 30MHz to 1GHz
FM demodulator suited for all types of wireless microphones
High sensitivity
Wide dynamic range
Variable IF (intermediate frequency) filter
Real-time spectrum analyser (both linear and logarithmic)
Built-in audio recorder
Spectrum sweeping, printing and user annotation
Directly interfaces with Shure Wireless Workbench 5+
Channel and environment memories
USB interface to Windows PCs
Optimised to work with short VHF/UHF antennas
RRP: $1265 (inc GST)


RESPONSES